Agentic Adventures -Side Quest LlamaLauncher Part 1
llama.cpp launcher
In the last post I did a deeper dive into the parameters that could be passed to llamma-server, in this post I am going to generate a tool to allow quick and easy experimentation with some of these params.
The initial ideal is for a PySide6 app that can launch llama-server with a chosen model (initally locally then via hugging face as well), then give the user the ability to save profiles, re-load them and launch.
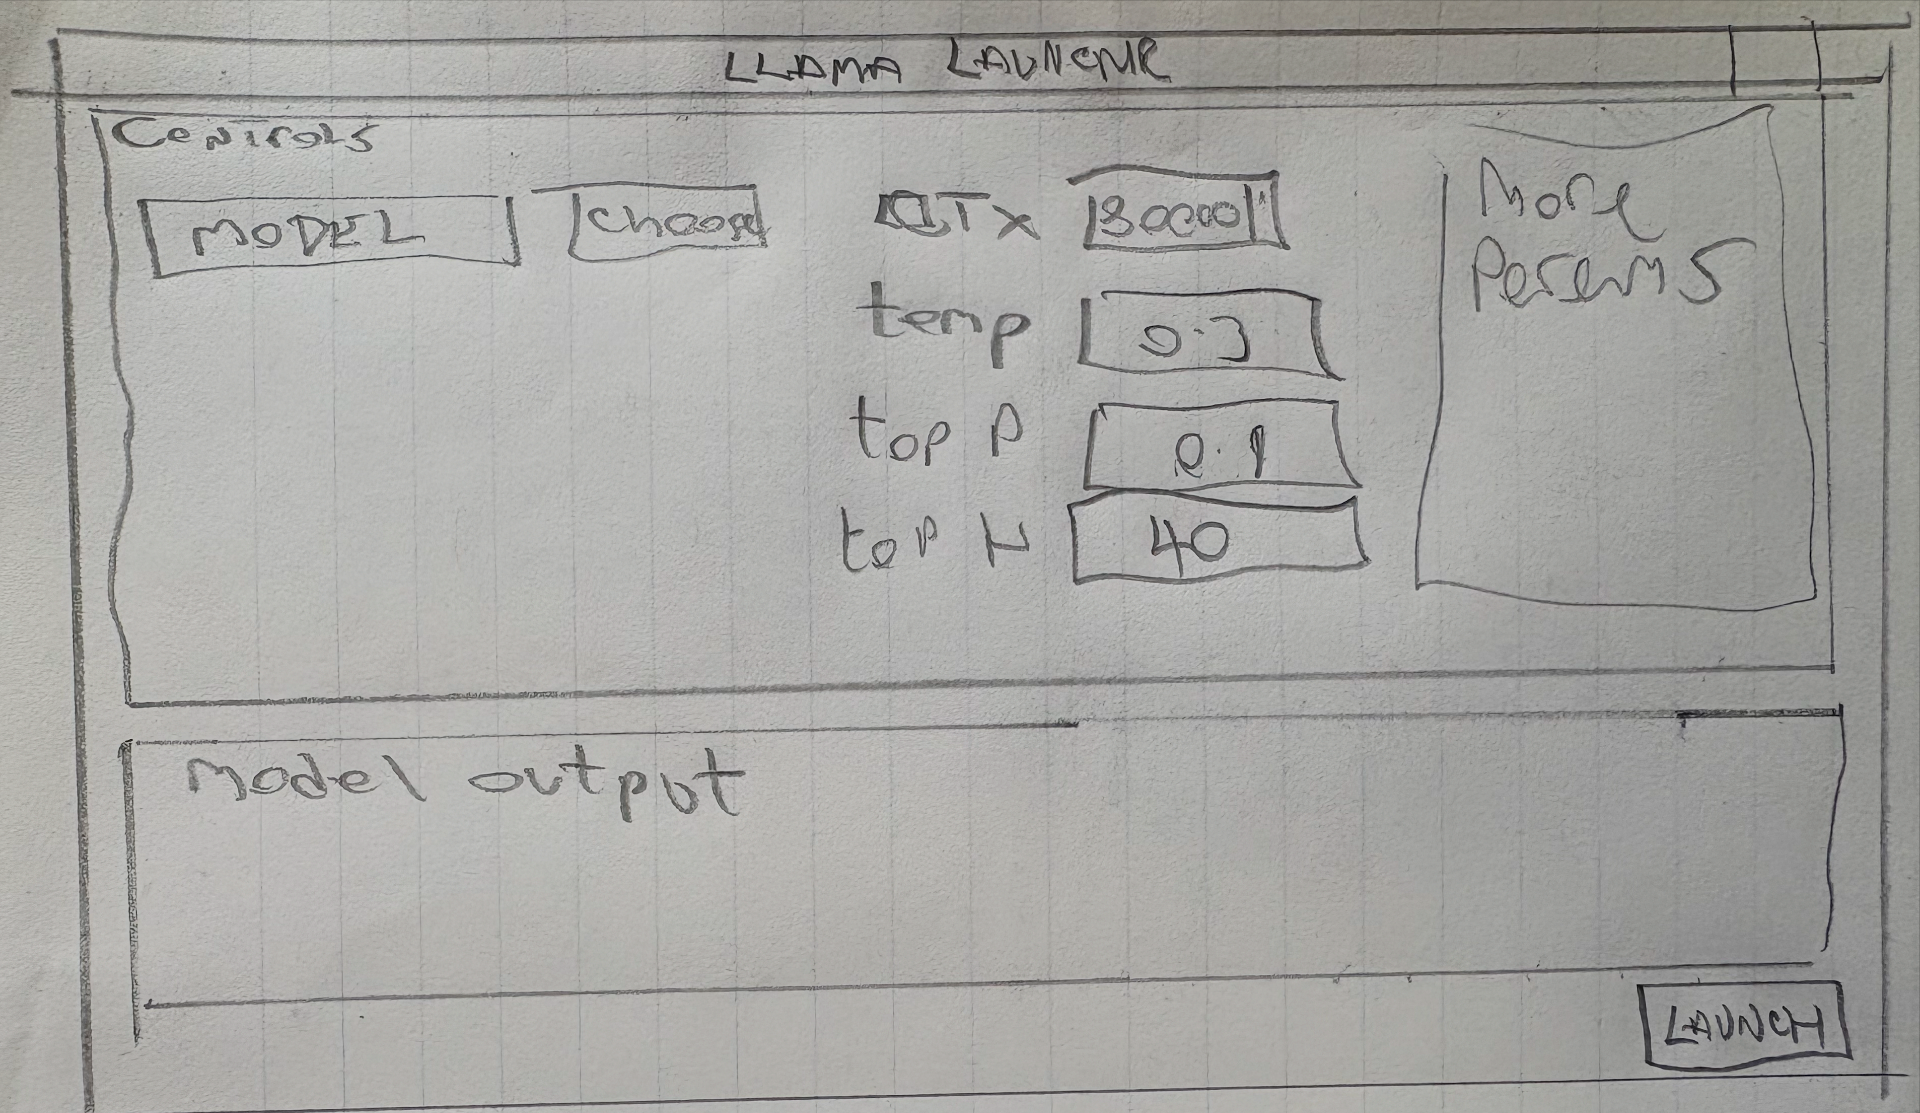
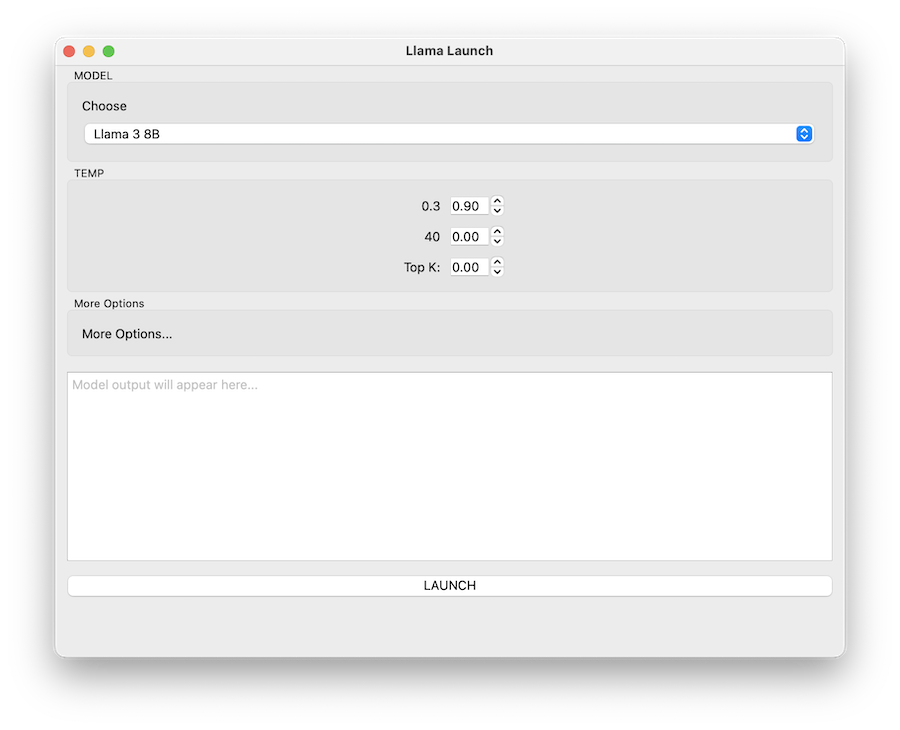
The initial UI design will be like this
Getting Started
To start I use uv to create a template project.
uv init LLamaLauncher
cd LLamaLauncher
uv add pyside6
So far I have had the best success with the Qwen3-Coder-30B-A3B-Instruct model so will use that. I have launched it with the following command line.
llama-server --api-key 12345 \
    -m ~/teaching/AI_Models/Qwen3-Coder-30B-A3B-Instruct-UD-Q4_K_XL.gguf  \
    --jinja -ngl 99 --ctx-size 32768 \
    --temp 0.5 --min-p 0.0 --top-p 0.90 --top-k 20 --repeat-penalty 1.05
Initial design prompt and AGENT.md
I am going to use my standard AGENT.md boiler plate for the project. This is slightly different from the simpler one I used in the previous demos but and is much more representative of ones I use with opencode and other tools.
# Global Agent Rules
## Git Workflow
When making code changes ALWAYS follow this process:

1. Ensure current branch is committed if not do not continue until the user has committed and pushed the changes.

2. Create a new worktree before editing:
   git worktree add .worktrees/<short-task-name> -b agent/<short-task-name>

3. Never commit directly to main or master.

4. Use conventional commit messages

5. After finishing changes:
   - run tests
   - run linters
   - ensure project builds


## Session Handling

After each agent run or session :

1. Export the session for traceability:
   export session text as markdown.

2. Save a summary in:
   docs/agent-sessions/<date>-session.md

3. Include:
   - goal
   - files changed
   - commands run
   - all chat context.

## Mandatory Rules

These rules must always be followed:
- NEVER make changes unless the current branch is committed.
- ALWAYS create a git worktree before editing code.
- NEVER modify protected branches.
- ALWAYS run tests before committing.
- ALWAYS export the session on each completed agent run

## Python Rules

### Essential Commands

# Run all tests
uv run pytest

# Run tests with coverage
uv run pytest --cov=src --cov-report=term-missing

# Run single test file
uv run pytest tests/test_vec3.py

# Run single test method
uv run pytest tests/test_vec3.py::TestVec3::test_addition

# Run tests matching pattern
uv run pytest -k "test_addition"

# Verbose test output
uv run pytest -v


# Lint and fix imports
uv run ruff check --select I --fix

# Format code
uv run ruff format

# Run all linting checks
uv run ruff check


### Package Management
- **Primary tool**: UV (modern Python package manager)
- **Lock file**: uv.lock for reproducible builds
- **Build system**: uv_build backend
- **Python version**: Requires Python 3.13+

## Code Style Guidelines

### General Principles
- **PEP 8 compliance**: Follow standard Python style guide
- **Type hints**: Required for all function signatures and class attributes
- **Docstrings**: Google-style docstrings for all public classes and methods
- **Import sorting**: Automatic with ruff (`--select I --fix`)
- **Line length**: Default ruff settings (88 characters)

### Import Conventions

# Standard library imports first
import math
from typing import Optional, List

# Third-party imports next
import numpy as np
from PySide6 import QtWidgets
import glfw

# Local imports last


### Naming Conventions
- **Classes**: PascalCase (`class Vec3:`, `class ShaderLib:`)
- **Functions/Methods**: snake_case (`def calculate_matrix()`, `def render()`)
- **Variables**: snake_case (`camera_position`, `shader_program`)
- **Constants**: UPPER_SNAKE_CASE (`MAX_LIGHTS`, `DEFAULT_SHADER`)
- **Private members**: Single underscore (`_data`, `_internal_method`)
- **Colour** is the correct spelling for **color** when referring to variable names

### Type Hints

from typing import Optional, List, Tuple, Union
import numpy as np

def transform_point(point: Vec3, matrix: Mat4) -> Vec3:
    """Transform a 3D point using a 4x4 matrix."""
    return Vec3()

class Camera:
    def __init__(self, position: Vec3, target: Vec3) -> None:
        self.position: Vec3 = position
        self.target: Vec3 = target


### Class Structure

class ExampleClass:
    """Example class following PyNGL conventions.

    Attributes:
        _data: Internal data storage using __slots__ optimization
        value: Public attribute with type hint
    """

    __slots__ = ["_data", "value"]

    def __init__(self, initial_value: float = 0.0) -> None:
        """Initialize the example class.

        Args:
            initial_value: Starting value for the instance
        """
        self._data = np.array([initial_value], dtype=np.float32)
        self.value = initial_value

    def method(self) -> float:
        """Example method with return type hint."""
        return float(self._data[0])


### Error Handling

def load_shader(vertex_path: str, fragment_path: str) -> int:
    """Load and compile shader files.

    Args:
        vertex_path: Path to vertex shader file
        fragment_path: Path to fragment shader file

    Returns:
        OpenGL shader program handle

    Raises:
        FileNotFoundError: If shader files don't exist
        RuntimeError: If shader compilation fails
    """
    if not os.path.exists(vertex_path):
        raise FileNotFoundError(f"Vertex shader not found: {vertex_path}")

    # Shader loading implementation...
    if not compiled_successfully:
        raise RuntimeError("Shader compilation failed")


### Testing Guidelines
- **Framework**: pytest with fixtures for OpenGL context
- **Test naming**: `test_` prefix for test functions and classes
- **Coverage**: Maintain high test coverage (excluding GUI widgets in CI)
- **Test data**: Use files in `tests/files/` for models, textures, shaders
- **OpenGL tests**: Use custom fixtures in `conftest.py` for context setup
- **running tests** : always run the whole test suite on changes
### Performance Optimizations
- Use `__slots__` in data-heavy classes (vectors, matrices)
- Prefer numpy arrays over Python lists for numerical data
- Use appropriate data types (np.float32 for graphics coordinates)
- Minimize Python-OpenGL API calls in tight loops

### Documentation
- **Docstring style**: Google format with Args, Returns, Raises sections
- **API docs**: Generated automatically via mkdocstrings
- **Examples**: Include usage examples in docstrings
- **Type hints**: Essential for documentation generation

### Script Execution
Always use uv shebang for executable scripts:
#!/usr/bin/env -S uv run --script


## Development Context

You are an expert in Python programming and related Python technologies such as uv.
You understand modern Python development practices, architectural patterns, and the importance of providing complete context in code generation.
Now this has been generated I need to start with the initial design prompt to get the basic app setup.
Image based models
Initiall I tried to dump the image above into the model to see if it would generate the basic ui for me, however I got
Error: This model does not support images yet
Oh well time for some research, it seems that https://huggingface.co/Qwen/Qwen3-VL-4B-Instruct-GGUF will do this for me so I will try to use this first for the initial mockup then go back to Coder for refinement.
llama-server --api-key 12345 -m ~/teaching/AI_Models/Qwen3VL-4B-Instruct-Q4_K_M.gguf
Now for an initial prompt.
Using Pyside6 implement the basic GUI from the image provided. You should use a QMainWindow app with QGroupBox for each of the elements and QPlainTextEdit for the app output area.
I have been using Qt for a number of years (Since Qt4!) so I have a lot of domain knowledge I can add. I have given the correct names for certain class, but left other a bit ambiguous to see how it fairs.
It seemed to start well, however it then got stuck in a loop with this message
# In a real application, you would probably do something more complex

# For now, let's just output some text

# In a real application, you would probably do something more complex

# For now, let's just output some text
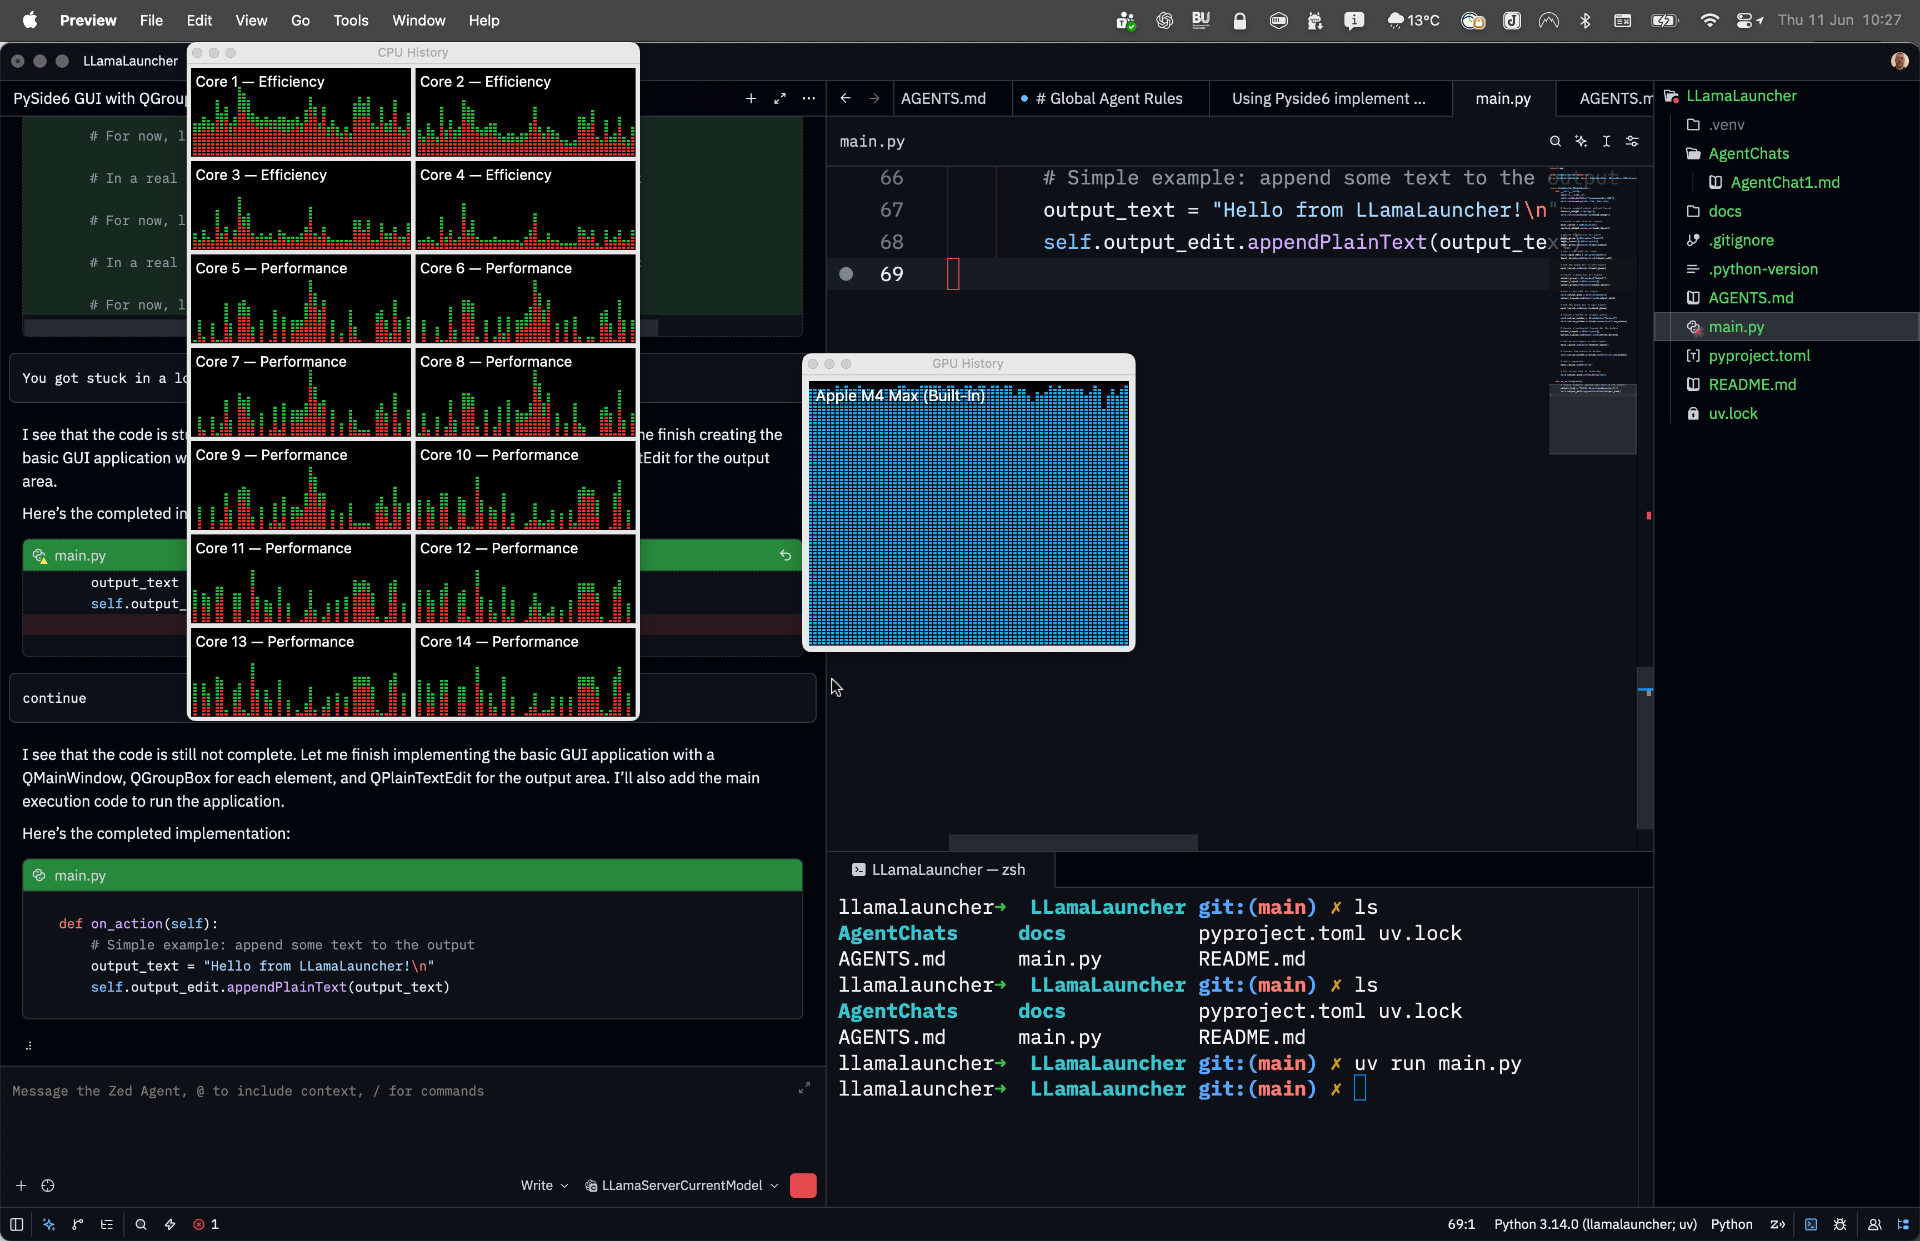
I stopped the process and asked it to continue which it tried to do but I think it has got lost in the context somewher and seems to be very slow, as you can see it is using all the resources, however unlike the gemma model I can still do other things.
AgentChat1.md shows the first interactions, once it got stuck, I re-started the server (with a -c 36000) then created a new thread as a summary and asked it to
please continue this development see [@main.py](file:///Volumes/teaching/Code/LLamaLauncher/main.py) for the current state.
(side note why do I say please to the agent? Does it make a difference? Who knows?)
It didn’t add the shebang so I had to add this also the requests library was used (for the server responce even tho not asked for) I doubt this will actuall be used as yet but I will add with uv for now.
There are a few more errors
Traceback (most recent call last):
  File "/Volumes/teaching/Code/LLamaLauncher/main.py", line 105, in <module>
    main()
    ~~~~^^
  File "/Volumes/teaching/Code/LLamaLauncher/main.py", line 99, in main
    window = MainWindow()
  File "/Volumes/teaching/Code/LLamaLauncher/main.py", line 49, in __init__
    self.action_button = QPushButton("Action")
                         ^^^^^^^^^^^
I manually added this as it was just a missing import and got this
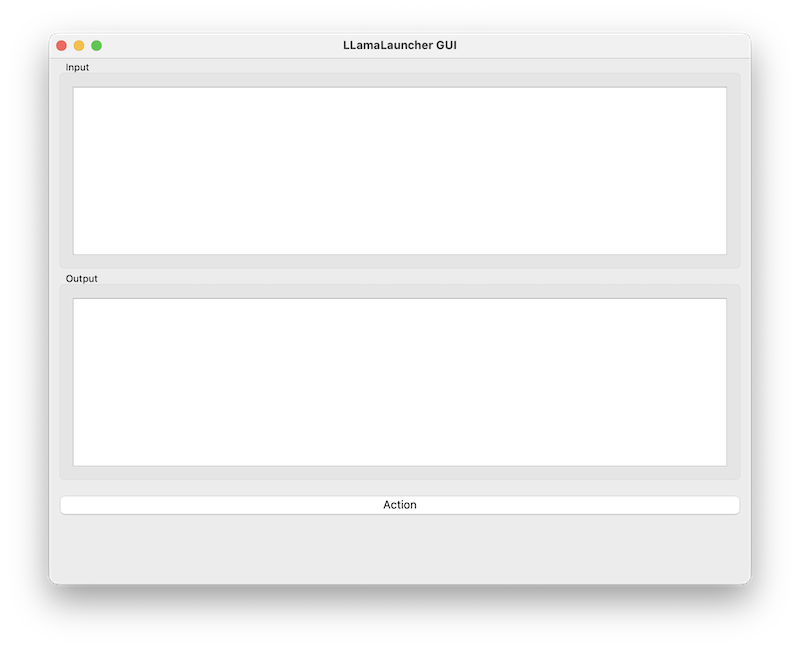
Not much like the image, did it actually look at it? Seems not, I tried to add the image and just noticed the pop saying this model doesn’t support images! That’s anoying I missed that (RTFM!), it seem that this is a two part system.
Qwen3-VL requires two files:
- The language model GGUF
- The matching mmproj (vision projector) GGUF
The Qwen release explicitly states that the GGUF distribution is split into an LLM and a vision encoder (mmproj) component (again RTFM Jon!) oh well lets see if I can get this to work.
Do it again!
Same inital setup as before but now I will use this to launch the server
llama-server --api-key 12345 -m ~/teaching/AI_Models/Qwen3VL-4B-Instruct-Q4_K_M.gguf --temp 0.3 --top-p 0.9 --top-k 40 -c 36000 --mmproj ~/teaching/AI_Models/mmproj-Qwen3VL-4B-Instruct-F16.gguf
Zed still fails to handle images even despite adding the config “images”: true to the openai_compatible settings. If I use the server at 127.0.0.1:8080 I can drag and drop the image and ask it to describe it to me
This is a hand-drawn wireframe or mockup sketch on graph paper, designed for an interface to interact with an Llama large language model. The sketch is titled “LLAMA LAUNCHER” at the top.

Here’s a breakdown of the components:

1. Title Bar:

    “LLAMA LAUNCHER” is written at the top, indicating the purpose of the application.

2. Controls Section (Top Half):
This section contains interactive elements for configuring the model.

    Model Selection:
        A “MODEL” dropdown or input field, next to a “Choose” button — suggesting the user can select or specify a model.

    GPU Settings:
        “RTX 3060” — indicates the GPU hardware being used (likely for local inference).

    Parameters:
        Temperature (temp): Set to “0.3” — a parameter that controls the randomness of the output. Lower values make outputs more deterministic.
        Top P (top_p): Set to “0.9” — controls the cumulative probability cutoff for sampling.
        Top K (top_k): Set to “40” — limits the model to consider only the top 40 most probable tokens.

    Model Outputs Section:
        A large blank area labeled “Model output,” which would display the generated text after the user clicks “LAUNCH.”

    Launch Button:
        A prominent “LAUNCH” button located at the bottom right, presumably to trigger the model inference.

3. Model Outputs Section:

    A large text box labeled “Model output” — where the LLM’s response will be displayed after processing.

4. Model Performance Section (Right Side):

    A “Model Perform” section (possibly a typo for “Model Performance”) — likely intended to display metrics like inference time, token count, or other performance indicators. However, this area is currently blank.

Summary:

This sketch represents a simple, functional UI for launching and configuring the Llama LLM locally. It's designed to allow users to:

    Select a model
    Set GPU usage
    Tune generation parameters (temperature, top_p, top_k)
    Launch the model for output generation

The sketch is clearly for prototyping or brainstorming — it’s hand-drawn, informal, and not pixel-perfect. It's well-organized and intuitive for users familiar with LLM configuration.

This is a practical UI for an LLM inference tool — likely intended for local development or personal use.
So this is a zed issue. Lets just use the cli and see if it will work.
llama.cpp cli tool
We can start the cli using the following
llama-cli -m ~/teaching/AI_Models/Qwen3VL-4B-Instruct-Q4_K_M.gguf --mmproj ~/teaching/AI_Models/mmproj-Qwen3VL-4B-Instruct-F16.gguf -c 36000
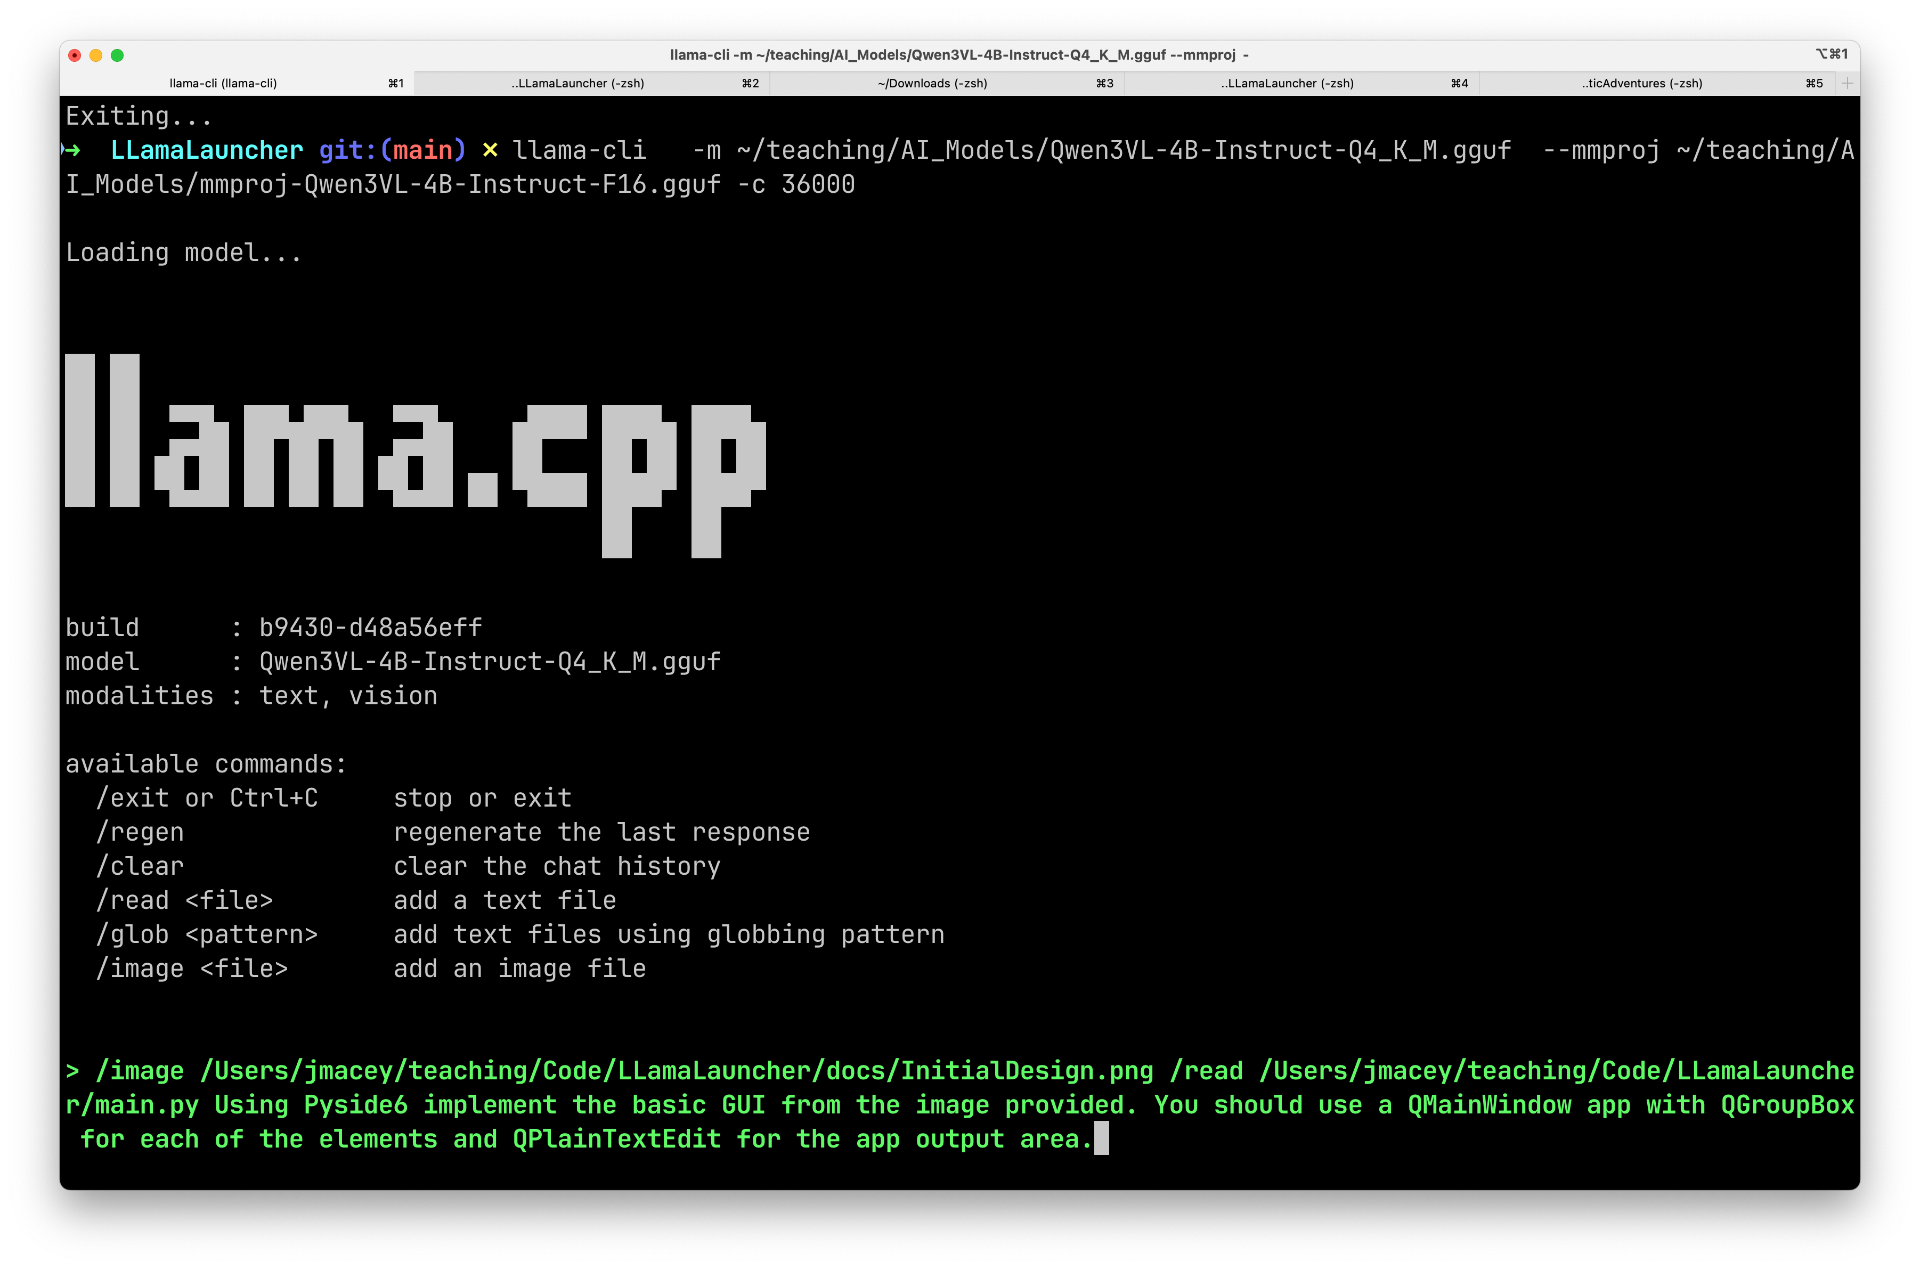
This is not as polished as the opencode cli, but I will give it a go.
It seems not to like the images and files being loaded on the same line as the prompt. It is now generating a GUI, however it is using tk not PySide! Let’s start again.
/read docs/InitialDesign.png

Loaded text from 'docs/InitialDesign.png'

> /read main.py

Loaded text from 'main.py'

> Using main.py for the code Using Pyside6 implement the basic GUI from the image provided. You should use a QMainWindow app with QGroupBox for each of the elements and QPlainTextEdit for the app output area. and write it to main.py

�PNG

�PNG

�PNG

�PNG

�PNG

�PNG

�PNG

�PNG

�PNG

�PNG
}}}}}}}}}}}}}}}}}}}}}}}}}}}}}}}}}}}}}}}}}}}}}}}}}}}}}}}}}}}}}}}}}}}}}}}}}}}}}}}}}}}}}}}}}}}}}}}}}}}}}}}}}}}}}}}}}}}}}}}}}}}}}}}}}}}}}}}}}}}}}}}}}}}}}}}}}}}}}}}}}}}}}}}}}}}}}}}}}}}}}}}}}}}}}}}}}}}}}}}}}}}}}}}}}}}}}}}}}}}}}}}}}}}}}}}}}}}}}}}}}}}}}}}}}}}}}}}}}}}}}}}}}}}}}}}}}}}}}}}}}}}}}}}}}}}}}}}}}}}}}}}}}}}}}}}}}}}}}}}}}}}}}}}}}}}}}}}}}}}}}}}}}}}}}}}}}}}}}}}}}}}}}}}}}}}}}}}}}}}}}}}}}}}}}}}}}}}}}}}}}}}}}}}}}}}}}}}}}}}}}}}}}}}}}}}}}}}}}}}}}}}}}}}}}}}}}}}}}}}}}}}}}}}}}}}}}}}}}}}}}}}}}}}}}}}}}}}}}}}}}}}}}}}}}}}}}}}}}}}}}}}}}}}}}}}}}}}}}}}}}}}}}}}}}}}}}}}}}}}}}}}}}}}}}}}}}}}}}}}}}}}}}}}}}}}}}}}}}}}}}}}}}}}}}}}}}}}}}}}}}}}}}}}}}}}}}}}}}}}}}}}}}}}}}}}}}}}}}}}}}}}}}}}}}}}}}}}}}}}}}}}}}}}}}}}}}}}}}}}}}}}}}}}}}}}}}}}}}}}}
Not good! Let’s start again.
/image docs/InitialDesign.png

Loaded media from 'docs/InitialDesign.png'

> Using Pyside6 implement the basic GUI from the image provided. You should use a QMainWindow app with QGroupBox for each of the elements and QPlainTextEdit for the app output area.

import sys
from PySide6.QtWidgets import (
    QApplication, QMainWindow, QGroupBox, QVBoxLayout,
    QHBoxLayout, QPlainTextEdit, QPushButton, QLabel,
    QFormLayout, QComboBox, QDoubleSpinBox
)
from PySide6.QtCore import Qt

class LlamaLaunchApp(QMainWindow):
    def __init__(self):
        super().__init__()
        self.setWindowTitle("Llama Launch")
        self.setGeometry(100, 100, 800, 600)

        # Create central widget and set layout
        central_widget = QWidget()
        self.setCentralWidget(central_widget)
        main_layout = QVBoxLayout(central_widget)

        # Create model selection group
        model_group = QGroupBox("MODEL")
        model_layout = QVBoxLayout()

        # Model choice combo box
        self.model_combo = QComboBox()
        self.model_combo.addItem("Llama 3 8B")
        self.model_combo.addItem("Llama 3 70B")
        self.model_combo.addItem("Llama 2 7B")
        self.model_combo.addItem("Llama 2 13B")
        self.model_combo.addItem("Llama 2 70B")

        # Add model choice to layout
        model_layout.addWidget(QLabel("Choose"))
        model_layout.addWidget(self.model_combo)

        model_group.setLayout(model_layout)

        # Create temperature group
        temp_group = QGroupBox("TEMP")
        temp_layout = QFormLayout()
        temp_layout.addRow("Temp:", QDoubleSpinBox())
        temp_layout.addRow("Top P:", QDoubleSpinBox())
        temp_layout.addRow("Top K:", QDoubleSpinBox())

        # Set initial values
        temp_layout.itemAt(0).widget().setValue(0.3)
        temp_layout.itemAt(1).widget().setValue(0.9)
        temp_layout.itemAt(2).widget().setValue(40)

        temp_group.setLayout(temp_layout)

        # Create more options group
        more_group = QGroupBox("More Options")
        more_layout = QVBoxLayout()
        more_layout.addWidget(QLabel("More Options..."))
        more_group.setLayout(more_layout)

        # Create launch button
        launch_button = QPushButton("LAUNCH")
        launch_button.clicked.connect(self.launch_model)

        # Create output area
        self.output_edit = QPlainTextEdit()
        self.output_edit.setReadOnly(True)
        self.output_edit.setPlaceholderText("Model output will appear here...")

        # Add widgets to main layout
        main_layout.addWidget(model_group)
        main_layout.addWidget(temp_group)
        main_layout.addWidget(more_group)
        main_layout.addWidget(self.output_edit)
        main_layout.addWidget(launch_button)

        # Add some spacing
        main_layout.addStretch()

        # Set window title
        self.setWindowTitle("Llama Launch")

    def launch_model(self):
        # Get current values
        model = self.model_combo.currentText()
        temp = self.temp_layout.itemAt(0).widget().value()
        top_p = self.temp_layout.itemAt(1).widget().value()
        top_k = self.temp_layout.itemAt(2).widget().value()

        # Simulate model launch
        output = f"Model: {model}\nTemperature: {temp}\nTop P: {top_p}\nTop K: {top_k}\n\nModel launched successfully!"

        # Update output text
        self.output_edit.setPlainText(output)

if __name__ == "__main__":
    app = QApplication(sys.argv)
    window = LlamaLaunchApp()
    window.show()
    sys.exit(app.exec())


This implementation creates a PySide6 application that matches the sketch provided. The key features are:

1. **Main Window**: A QMainWindow with the title "Llama Launch"
2. **Control Groups**: Three QGroupBoxes for "MODEL", "TEMP", and "More Options"
3. **Controls**:
   - Model selection dropdown with several Llama model options
   - Temperature, top_p, and top_k sliders (QDoubleSpinBox)
4. **Output Area**: A QPlainTextEdit for displaying model output
5. **Launch Button**: A button that triggers the "launch_model" function

The layout is organized similarly to the sketch, with the controls at the top and the output area below. The "More Options" group is represented as a QGroupBox with a placeholder text, as shown in the sketch.

The application is designed to be simple and functional, with the launch button triggering a simulated model launch that updates the output area with the selected parameters.

[ Prompt: 774.7 t/s | Generation: 101.4 t/s ]
I asked it to save to main.py but it didn’t copy paste time again.
Still some errors
./main.py
Traceback (most recent call last):
  File "/Volumes/teaching/Code/LLamaLauncher/./main.py", line 107, in <module>
    window = LlamaLaunchApp()
  File "/Volumes/teaching/Code/LLamaLauncher/./main.py", line 27, in __init__
    central_widget = QWidget()
                     ^^^^^^^
NameError: name 'QWidget' is not defined
This is an import error so an easy manual fix.
Next
Traceback (most recent call last):
  File "/Volumes/teaching/Code/LLamaLauncher/./main.py", line 108, in <module>
    window = LlamaLaunchApp()
  File "/Volumes/teaching/Code/LLamaLauncher/./main.py", line 58, in __init__
    temp_layout.itemAt(0).widget().setValue(0.3)
    ^^^^^^^^^^^^^^^^^^^^^^^^^^^^^^^^^^^^^^^
AttributeError: 'PySide6.QtWidgets.QLabel' object has no attribute 'setValue'
As this is a label there is no setValue and it seems to have mixed some types, however with a few manual fixes I have the following gui.
Not bad, the combo box is interesting as it has filled it with different models, the Overall models stuff isn’t quite correct but it will do for now. Lets turn back to a better coding model and focus on the actual development. The cli chat can be found in
AgentChat2.md
Updating the GUI
I decided to start doing some simple / focused updates. I have also been reading about using Multi-Token Prediction so decided to give this a go as well. I have switched back to the coder model now as I am not using images and using the following server config.
llama-server --api-key 12345\
    -m ~/teaching/AI_Models/Qwen3-Coder-30B-A3B-Instruct-UD-Q4_K_XL.gguf \
    --jinja -ngl 99 --ctx-size 32768 \
    --temp 0.7 --min-p 0.0 --top-p 0.80 --top-k 20 --repeat-penalty 1.05 --spec-type draft-mtp \
    --spec-draft-n-max 4
From the article
We found –spec-draft-n-max 2 is the best starting point however, do not assume 2 is optimal, as performance is hardware-dependent. Try any value from 1 through 6 and use whichever is fastest for your system. Unsloth Studio automatically sets the ideal MTP settings optimized for your specific hardware (Mac, CPU, GPU etc.) - you can still change it later.
Oh seems this model doesn’t support MTP but this (bigger one at 22Gb) does https://huggingface.co/unsloth/Qwen3.6-35B-A3B-MTP-GGUF I would not be able to run this in the labs but hopefully my mac can cope we will see.
First task is going to be to update the choose / model option to allow the user to choose the model via a file dialog. I will use the following prompt.
At present there is a model selection combo box in @main.py replace this with a qlineedit and a button that allows the user to choose the model. The model full path should be stored as part of the class but on the final model name (.gguf) should be displayed in the qlineedit. When pressing the select button a file dialog will be shown wiht the filter of .gguf, if selected the full path will be stored in the class and the name put into the edit.
Wow this model seem fast (and accurate), It missed a couple of imports at first bit managed to get the thing working very quickly. I then asked it to do a re-factor
The UI generation code is quite large now re-factor to have smaller functional units for distinct elements along with python PEP8 guidelines
It started to generate new Widget classes for various elements and then smaller helper functions to create the GroupBoxes not the overall design I would have chosen but quite neat.
aside for a ui
I’ve just had a thought, could the AI reverse engineer the current code and generate a PySide ui file?
Can you create a PySide ui file for the current application?
Well that is very cool, seems it can AgentChat4.md
 Now I need to decide which approach to take. It is far easier to use the UI for the basic design. I will need to setup some UI loading, the agent has suggested
from PySide6.QtUiTools import QUiLoader
loader = QUiLoader()
window = loader.load("ui/llama_launch.ui")
but I know from experience I need to do more so that the ui components become members of the class. I think I will use this approach, but will save that for tomorrow, in another post.